Using Word's Style Gallery to Create Structure in Your Document
Add both structure and consistency using appropriate headings in the appropriate order in Word. Utilizing the in-program styles, screen readers can easily scan the information, and it provides a visual style to the document. Additionally, authors can easily create such things as a Table of Contents or view an Outline.
Changing text formatting is not the same as changing Style
Applying font changes to the text does not provide document structure—or information—for screen readers.
Screen Reader Demo With Headings [YouTube]
Step-by-step guide to Headings in Word using the File menu
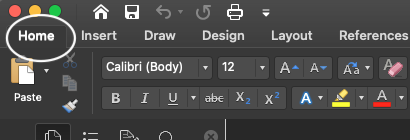
- Navigate to the Home menu...
...to find the Styles Gallery.
Selecting and formatting text in the body of the document
There are a few ways to proceed from here. Selecting and formatting the text in the body of the document is demonstrated below. To request or suggest other demos, please contact accessibility@swarthmore.edu.
- Select the text to format.
Title or Subtitle
It is an extremely rare instance that you will use the style "Title" or "Subtitle" found in the Styles Gallery, Pane, or Pulldown. If you have questions, please reach out to accessibility@swarthmore.edu.
Because this is the "Title," select Heading 1.
Heading 1
You will only ever use Heading 1 or
<h1>once in your materials.In Microsoft Office, Heading 1 will usually coincide with "Title" in the document’s metadata.
In HTML,
<h1>and<title>often have some kind of relationship.
If you have questions, please reach out to accessibility@swarthmore.edu.
Continue through the document using subsequent headings in order, i.e. Heading 2, Heading 3, Heading 4.
Utilize any of the familiar formatting options, such as the Font menu and the Paragraph menu, to build the desired formatting into these headings, including line and paragraph spacing or first-line indents. Only select one version of each heading to format it; that is, don't bother formatting multiple places in the document to the desired look for Heading 2 or Heading 3.
Underlines are for links
- Select the Heading 2 text that has been formatted in step 6.
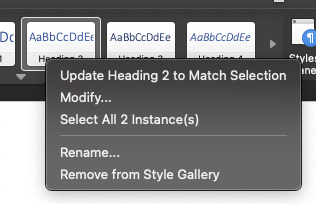
Click on Home and navigate to the Styles Gallery. Right-click or control-click on Heading 2.
- Select Update Heading 2 to Match Selection and be amazed.
Do this for all subsequent headings.
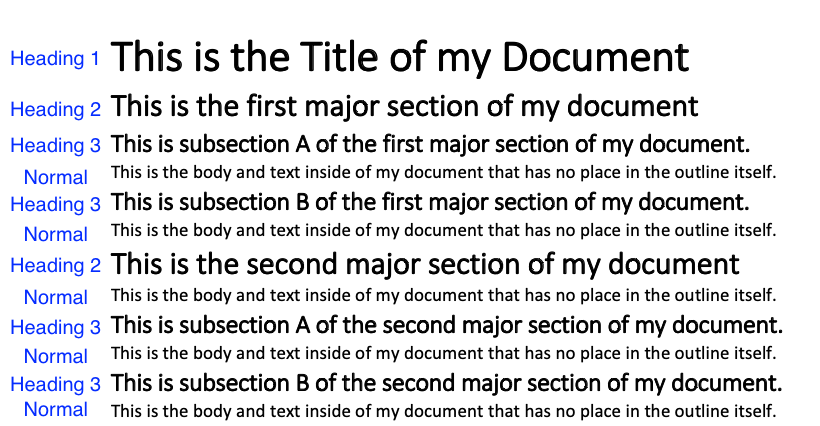
Here's a snapshot of the document, with indicators for each section and subsection.
Headings v. Normal text
Of course, any document will also have normal text. In fact, the majority of most documents will be marked as Normal text.
Step-by-step guide to Headings in Word using keyboard shortcuts
- Type the text you want into a Word document.
- Select a sentence/phrase that you want to become a heading.
- Press Alt+H, then L,
- and then select the heading you want, such as the Heading 1 button.
Common Pitfalls
- Manually entering space between paragraphs. Build these spaces into each style.
- Indented lines for visual appeal. Making a document look a certain way does not have to come at the price of making it inaccessible. Ask questions such as why the indent is needed? To make a list stand out? If so, use the Style Gallery to choose a bulleted or numbered list if it is a list of some kind.
- Utilizing bold or italicized text to create meaning or make something stand out. Use your words to make something stand out. Ask questions such as why the bolded or italicized text is needed? What is being conveyed? Can it also be conveyed with words? If what one is trying to accomplish with bolded text is to grab attention, it is also useful to put words like "Important:" or "Note:" or "Attention:" in front so that someone who is using a screen reader does have the same audible cue as a reader with sight would.
Related articles
Contributors
Related content
Ways you can contact ITS or find information:
ITS Support Portal: https://support.swarthmore.edu
Email: support@swarthmore.edu
Phone: x4357 (HELP) or 610-328-8513
Check out our remote resources at https://swatkb.atlassian.net/wiki/spaces/remote/overview
Check our homepage at https://swarthmore.edu/its


