Domain of One's Own: WordPress Navigation Menu
Building Your Custom Menu
Start at your site’s Dashboard and choose Appearance > Menus.
In the Custom Menus interface that appears, type a name for your menu. This can be anything you want. It doesn’t get displayed anywhere; it’s used by WordPress to identify and place your menu. Once you’ve typed the name, click Create Menu.
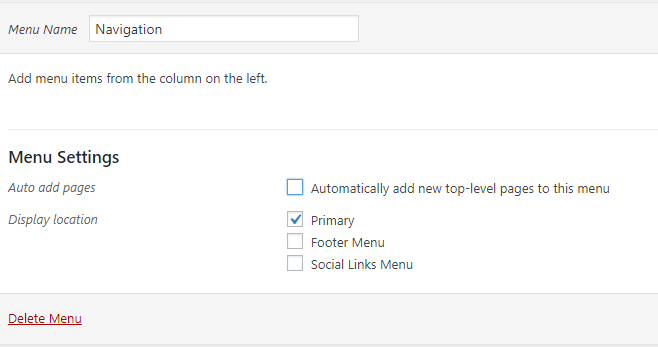
You’ll now be presented with a screen that includes a section titled Menu Settings. This is where you’ll indicate where you want your menu to appear in your theme. The number of locations available depends on the theme you choose. In the example shown below, there are two areas available; we’ve chosen to place the menu in the Primary area which we know corresponds to the header menu. You may need to experiment a bit in order to find out where your menu will appear in your theme.
You can always change this location later by coming back here and clicking the Manage Locations tab.
Now that you’ve set up your menu and assigned it to a location, you can begin to add links to it. On the left-hand side of the screen, you’ll see what content is available to add. On the right-hand side of the screen, in the Menu Structure area, you can arrange and organize your links.
By default, you may not see everything that is available to you to add to your menu. For example, posts can be added to menus, but they’re not usually displayed by default. To make more content available, click the Screen Options tab at the top of your WordPress screen, and then click off the check boxes that correspond to additional content.
To add content to your menu, simply check it off on the left, and click the Add to Menu button.
Your new content will appear on the right, and you can drag items in the order you want them to appear. Drag items to the right to indent them under other items. This will usually make them appear as drop-down items in your menu.
You can add custom links to your menu by clicking the Custom Links section on the left. In the short form that appears, enter your link’s URL, and text for the link. Click Add to Menu to move it to the left.
Note that you can change the link text of any item you add to your menu. This can be helpful if you have a page with a long title, and you’d like the link to not take up so much space. You can abbreviate the title in the Navigation Label section (found by selecting the arrow to the right of the menu item), and that shorter text will become the actual menu link.
When you are done, make sure you click Save Menu.
Other Notes about Menus
When you add a Category or Tag to a menu, the link will take your readers to an archive of all the posts on your site that use that category or tag. This can be a very useful feature for organizing your content when you’re using posts to share your work.
In addition to assigning Custom Menus to theme areas, there is a default Custom Menu widget that you can put in the sidebar of your site. This is useful for creating smaller, customized navigation for your site.
Reading Settings – Front Page
By default, the front page of your site is a blog, but you can also change that to a static page and move your blog, if you wish to have one, to another location on your site.
Start at the Dashboard.
Navigate to Settings > Reading.
The front page displays your latest blog posts by default. You may also select a Page from the website to serve as your front page. This page has to exist before you can select it. Select the “A static page” radio button and choose the Sample Page from the Front page drop-down menu (a Sample Page was created for you when you installed WordPress). Click the Save Changes button and now you will have the Sample Page as your Front page.
To place your blog posts elsewhere, first, create a new Page and title it Blog (you can title it whatever you want but Blog is common and descriptive). Leave the page blank (don’t type any text in the edit box) and Publish it. Now go back to Settings > Reading. Under the static page area choose Blog from the Posts page drop-down. Click the Save Changes button.
If you click on the Blog menu item when on the public side of your website, you will see your blog posts. Notice the /blog added to the web address.
Ways you can contact ITS or find information:
ITS Support Portal: https://support.swarthmore.edu
Email: support@swarthmore.edu
Phone: x4357 (HELP) or 610-328-8513
Check out our remote resources at https://swatkb.atlassian.net/wiki/spaces/remote/overview
Check our homepage at https://swarthmore.edu/its